How to Remove Write Protection From My USB Flash Drive
Write
protection is a powerful resource which allows users to ensure the
safety and legitimacy of content on a drive. If you've placed important
material that shouldn't be altered on a drive that's shared among
collaborators or other individuals, write protection can create specific
"privileges" for each user and remove a person's ability to alter
content on the drive. The time may come, however, when you need to
remove write protection on your USB drive or reassign authoring
permissions to another individual. Fortunately, removing write
protection from USB flash drives can be accomplished quickly and easily
using a few simple steps.


Image Credit: AntonioGuillem/iStock/GettyImages
How to Remove Write Protection on USB Drives
Edit Windows Registry Key
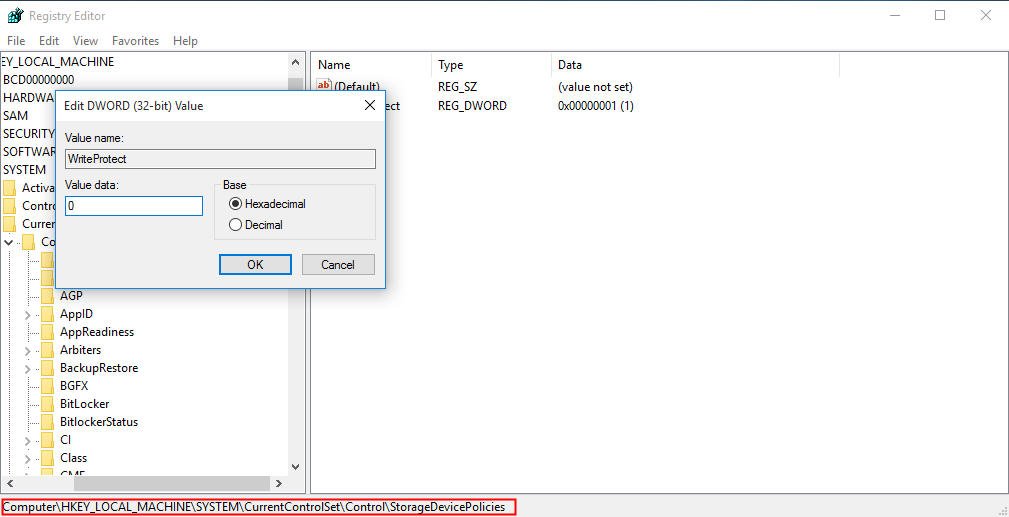
When the value of Windows Registry Key is set incorrectly, you can remove write protection using Registry Editor.1. Type “regedit” in Run dialogue.
2. Navigate to the path below:
Computer\HKEY_LOCAL_MACHINE\SYSTEM\CurrentControlSet\Control\StorageDevicePolicies
3. Double click WriteProtect and Changethe value data from 1 to 0. Then, click “OK”.
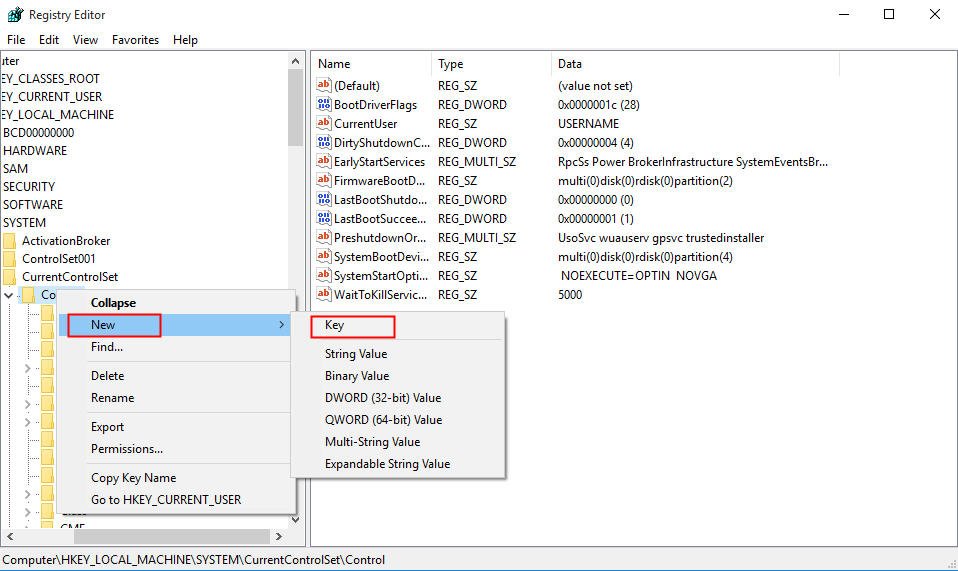
Note: It is possible that there is no StorageDevicePolicies under Control. If you are in such case, you can right click Control and go to “New”>“Key”. Then name it with StorageDevicePolicies.
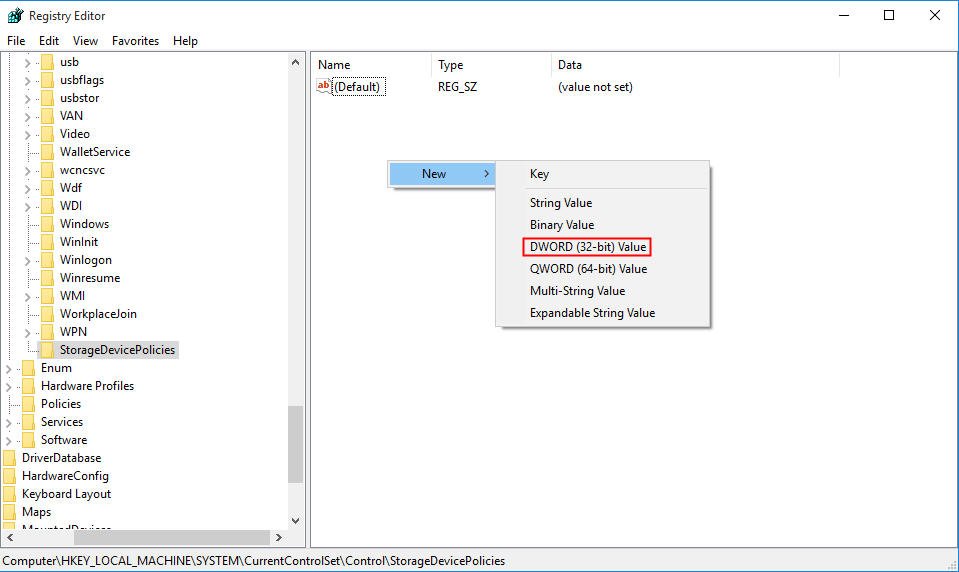
At the right-hand pane, right click white space and go to
“New”>“DWORD (32-bit) value”. Name it with Write Protect and open it to set the
Value data to 0.
4. Close Regedit Editor and check whether the write protection is removed.Source
How to Remove Write Protection on Flash Drives
If
you have administrator access to your computer and are the original
owner of the drive, you can adjust Read/Write settings on the drive
itself by right-clicking the USB icon once it's plugged into your
computer and selecting "Security" from the "Properties" menu. After
entering your administrator password, you should be able to enable
"Write" settings for other users as needed.
Keep
in mind that you can use these same processes repeatedly as needed in
order to modify a user's permission as needed. For example, you can
repeatedly lock or unlock a USB drive if allowing collaborators to add
or modify content at specific periods of time. It's important to
remember, however, that unlocking a drive does allow anyone in
possession of the drive to modify all available content as he sees fit.
How to Remove Read-Only From a USB Drive
If
your external USB drive is in "Read-Only" mode, that means that no
changes can be made to the contents of the drive. The files can be
viewed and opened, but cannot be moved, deleted or edited. If you wish
to have full read/write access to the USB drive, you must first adjust
the drive's permissions. You will need to log in as the administrator to
do so.


Image Credit: littlehenrabi/iStock/Getty Images
Step 1
Log in to Windows using the administrator account.
Step 2
Connect the USB drive to the computer.
Step 3
Double-click "Computer" on the desktop. Right-click the USB drive, select "Properties."
Step 4
Open the "Security" tab, click "Edit..."
Step 5
Select
the user you wish to give write access to, or select "Everyone." Set
all permissions to "Allow." This lets the selected user view and edit
the contents of the drive.


Comments
Post a Comment